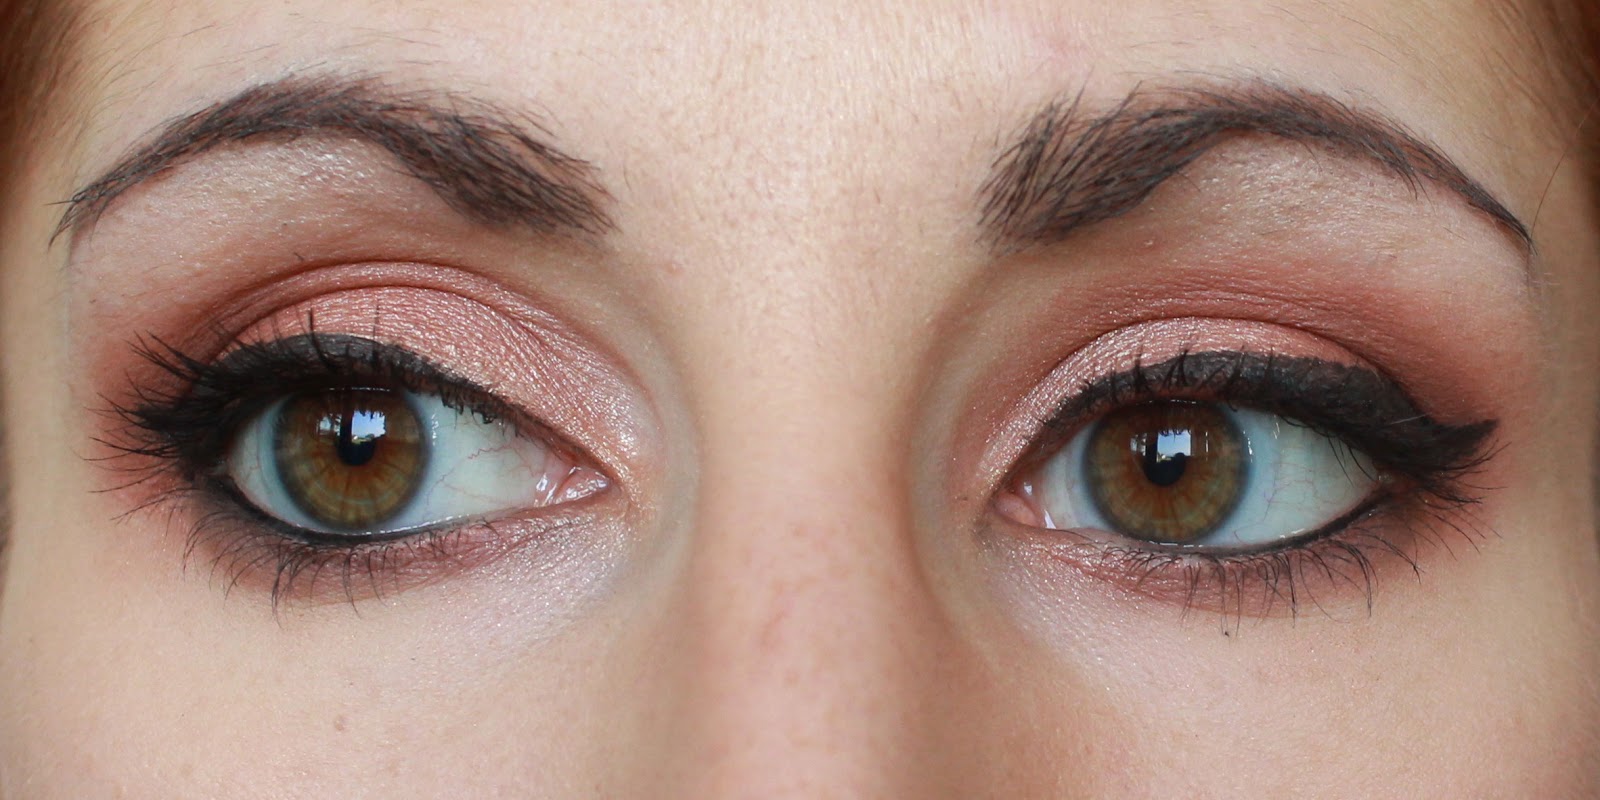
Hello Starshines!
I hope everything is fine for you and that Summer is on its way to you ;) Today's look is very simple and will suit everyone! Purples are so easy to wear and it's my favorite color of all time. I also wanted to use Makeup Geek Homecoming because it's such a beautiful color! Subtle but yet strong enough to add a little edge to any makeup! It's the perfect shade of medium brown with speckles of gold that make it shine and enhance every eyecolor, outfit and skin tone! Go and get it, it goes with everything!
Product used:
Makeup Geek Eyeshadows in: Peach Smoothie, Frappe, Homecoming, Sensuous and Drama Queen
Maybelline Eyestudio Gel Liner
Cover Girl Lashblast Volume Mascara
Sigma Brushes
Essence eyebrow kit
Tutorial:
1. Blend Peach Smoothie with an E40 all over the eyelid. This will help blending the following colors and act as a based for the makeup.
2. With an E25, place Frappe on the outter V then build it up towards the crease and extent it on the brow bone.
3. Place Homecoming with an E55 on the inner lid.
4. With the same E55 place Sensuous on the outter part of the lid, this is kind of a transition shade and you don't have to be super precise when applying it, it will just make the look seamless.
5. With an E45 place Drama Queen on the outter V. Place the tip of the brush on your crease then work the colros with rainbow motions. Add color little by little to make sure there's no harsh line
6. Do eyeliner, either a small line or a thick wing or nothing at all ;)
7. Place black khol on the tightline and waterline
8. With an E20 place Drama Queen on the outter part of the lower lash line, Sensuous on the middle and Homecoming on the inner before blending it with a clean E30.
9. To enhance the look and prevent the khol to smudge, take an E15 and gently dab the three colors between the base of your lashes and your waterline (is that make sense?)
10. Put highlight on the inner tear duct (Makeup Geek Shimma Shimma is my all time favorite) and brow bone, put mascara and you're all done!
I hope you enjoyed this look!
Tuesday, June 17, 2014
Thursday, June 12, 2014
Beware the Shark!
Hello Starshines!
Have you already checked the brand new Makeup Geek eyeshadows? If you haven't I strongly recommande that you do because the five new additions to the line are wonderful ;) I personally ordered Shark Bait, a matte deep blue-green shade and today I played with it. I've always wanted to do a kind of Smokey eyes with a pop of colors such as the ones Jaclyn Hill or Alison Henry did (check their tutorial if you haven't yet ;) So here's the look!


Product used:
Makeup Geek Eyeshadows in: Peach Smoothie, Frappe, Bleached Blond, Brown Sugar, Shark Bait and Mermaid
Maybelline Eyestudio Gel Liner
Cover Girl Lashblast Volume Mascara
Sigma Brushes
Essence eyebrow kit
Tutorial:
1. After priming your eyes, place Peach Smoothie all over the lid with an E40 taking it up high until the brow bone. This step will help to blend the colors
2. With an E35 place Frappe (ohmigoodness this shade is amazeballs!) on it crease and blend it toward the brow bone. Make it pretty intense but work it up smoothly as you reach the brow bone.
3. With a flat brush like the E55 place Bleached Blonde on the inner third of the lid.
4. Take and E45 (the perfect brush to work dark shades in the crease!) and Brown Sugar then placing the tip of the brush in the crease work the color in rainbow motion to fill the outter V and stretch the line smoothly into the crease. You can dab some more product on the very outter corner to add more depth!
5. Draw a pretty thick line of eyeliner, this will enhance the colors on the lower lashline!
6. With an E20 place Shark Bait on the outter third of the lower lashline and take it all along the wing of the eyeliner. Blend it with and E30
7. With the same E20 place some Mermaid on the inner part of the lashline and... blend it again. Blend it until it's smooth and nice but take care not to bring the color farther than your lashes because it will draw your eyes down!
8. Put black pencil khol on your tighline and waterline to add more depth and give a smokey effect to the look.
9. With an E15 place some Shark Bait close to your waterline, this will enhance the color and also prevent the khol to smudge during the day!
10. Highlight your inner tear duct and brow bone, put mascara and you're all done!
I hope you enjoyed this look and go check out Makeup Geek's new eyeshadows!
I wish you an amazing day!
<3<3
Maylee
Have you already checked the brand new Makeup Geek eyeshadows? If you haven't I strongly recommande that you do because the five new additions to the line are wonderful ;) I personally ordered Shark Bait, a matte deep blue-green shade and today I played with it. I've always wanted to do a kind of Smokey eyes with a pop of colors such as the ones Jaclyn Hill or Alison Henry did (check their tutorial if you haven't yet ;) So here's the look!
Product used:
Makeup Geek Eyeshadows in: Peach Smoothie, Frappe, Bleached Blond, Brown Sugar, Shark Bait and Mermaid
Maybelline Eyestudio Gel Liner
Cover Girl Lashblast Volume Mascara
Sigma Brushes
Essence eyebrow kit
Tutorial:
1. After priming your eyes, place Peach Smoothie all over the lid with an E40 taking it up high until the brow bone. This step will help to blend the colors
2. With an E35 place Frappe (ohmigoodness this shade is amazeballs!) on it crease and blend it toward the brow bone. Make it pretty intense but work it up smoothly as you reach the brow bone.
3. With a flat brush like the E55 place Bleached Blonde on the inner third of the lid.
4. Take and E45 (the perfect brush to work dark shades in the crease!) and Brown Sugar then placing the tip of the brush in the crease work the color in rainbow motion to fill the outter V and stretch the line smoothly into the crease. You can dab some more product on the very outter corner to add more depth!
5. Draw a pretty thick line of eyeliner, this will enhance the colors on the lower lashline!
6. With an E20 place Shark Bait on the outter third of the lower lashline and take it all along the wing of the eyeliner. Blend it with and E30
7. With the same E20 place some Mermaid on the inner part of the lashline and... blend it again. Blend it until it's smooth and nice but take care not to bring the color farther than your lashes because it will draw your eyes down!
8. Put black pencil khol on your tighline and waterline to add more depth and give a smokey effect to the look.
9. With an E15 place some Shark Bait close to your waterline, this will enhance the color and also prevent the khol to smudge during the day!
10. Highlight your inner tear duct and brow bone, put mascara and you're all done!
I hope you enjoyed this look and go check out Makeup Geek's new eyeshadows!
I wish you an amazing day!
<3<3
Maylee
Tuesday, June 10, 2014
Goddess Glow (A Makeup Geek Summer Smokey)
Hello Starshines!
One of my favorite makeup look of all time is the smokey eyes. Yet, in summer I find hard to wear this kind of dramatic look so I feel a bit frsutrated. Anyway, today I decided I needed to do a Smokey and with the help of the wonderful warm tones from Makeup Geek, I came with this! It was also a wonderful occasion to try their marvelous pigment Afterglow!!


Products used:
Makeup Geek Eyeshadows: Crème Brulee, Goddess, Cocoa Bear and Brown Sugar
Makeup Geek Pigment: Afterglow
Maybelline Eyestudio Gel Liner
Cover Girl Lashblast Volume Mascara
Sigma Brushes
Essence eyebrow kit
1. Apply Crème Brulee with an E40 all over the eyelid to help blend the colors.
2. With an E 35 blend Cocoa Bear on the outter V and take it in the crease, work it pretty high for a dramatic smoked effectbut make sure to blend the edges well near the brow bone so it won't be stark brown up there!
3. Taking an E55, dab Goddess on the middle on the eye and drag it into the outter part of lid. You don't have to be super precise in the blending here as we're gonna add some more colors afterwards.
4. With an E57 (my fav brush ever to apply pigment!) place Afterglow on the inner corner then smoooth it out upward and onto Goddess (if that makes any sense >_<)
5. With an E25 place Brown Sugar on the outter V then holding the brush sideways bring it into the crease. Then turn the brush and sweep back and forth with no additional product.
6. Apply a dramatic winged eye-liner because you want to be bold and dark ;) and put black khol on the upper AND lower waterlines (placing khol on the upper lashline will add more depth to the look and enhance the smokey effect!)
7. For the lower lashline use an E15 to place Brown Sugar on the outter part and Goddess on the middle part. Place the brush really close to he waterline so the eyeshadows will prevent the khol to smear throughout the day.
8. Smudge it with an E20 and Crème Brulee.
9. Apply Shimma Shimma on the brow bone, put mascara and you're all done!
I hope you enjoyed this look, please leave a comment if you did and I wish you all an amazing day!
<3<3
Maylee
One of my favorite makeup look of all time is the smokey eyes. Yet, in summer I find hard to wear this kind of dramatic look so I feel a bit frsutrated. Anyway, today I decided I needed to do a Smokey and with the help of the wonderful warm tones from Makeup Geek, I came with this! It was also a wonderful occasion to try their marvelous pigment Afterglow!!
Products used:
Makeup Geek Eyeshadows: Crème Brulee, Goddess, Cocoa Bear and Brown Sugar
Makeup Geek Pigment: Afterglow
Maybelline Eyestudio Gel Liner
Cover Girl Lashblast Volume Mascara
Sigma Brushes
Essence eyebrow kit
1. Apply Crème Brulee with an E40 all over the eyelid to help blend the colors.
2. With an E 35 blend Cocoa Bear on the outter V and take it in the crease, work it pretty high for a dramatic smoked effectbut make sure to blend the edges well near the brow bone so it won't be stark brown up there!
3. Taking an E55, dab Goddess on the middle on the eye and drag it into the outter part of lid. You don't have to be super precise in the blending here as we're gonna add some more colors afterwards.
4. With an E57 (my fav brush ever to apply pigment!) place Afterglow on the inner corner then smoooth it out upward and onto Goddess (if that makes any sense >_<)
5. With an E25 place Brown Sugar on the outter V then holding the brush sideways bring it into the crease. Then turn the brush and sweep back and forth with no additional product.
6. Apply a dramatic winged eye-liner because you want to be bold and dark ;) and put black khol on the upper AND lower waterlines (placing khol on the upper lashline will add more depth to the look and enhance the smokey effect!)
7. For the lower lashline use an E15 to place Brown Sugar on the outter part and Goddess on the middle part. Place the brush really close to he waterline so the eyeshadows will prevent the khol to smear throughout the day.
8. Smudge it with an E20 and Crème Brulee.
9. Apply Shimma Shimma on the brow bone, put mascara and you're all done!
I hope you enjoyed this look, please leave a comment if you did and I wish you all an amazing day!
<3<3
Maylee
Thursday, June 5, 2014
Nightlife Berry
Hello Starshines!
I don't know for you but here's Summer is finally here! So is Razzleberry in the Makeup Geek store! I've been wanting this shade since I first discovered the brand but it was always out of stock! Sadly it's is already out of stock again but I was able to have my own so I tried it with this look which also features my favorite pigment from Makeup Geek, and no, it's not Afterglow but Nightlife.


Products used:
Makeup Geek Eyeshadows: Peach Smoothie, Cupcake, Razzleberry (obviously ;)), Cocoa Bear, Burlesque and Cinderella
Makeup Geek Pigment: Nightlife
Sigma Brushes
Tutorial
1. Blend Peach Smoothie all over the lid with an E40, this warm shade is just the perfect peachy pink to use as a transition shade for this look!
2. With an E35, place Cupcake on the outter V and stretch it into the crease, here, this color will smooth harsh line with the main lid colors.
3. Place Razzleberry with an E25 on the outter V and the crease, on a smaller part than Cupcake.
4. With an E55 place Nighlife on the inner part of the lid beginning in the very inner then sweeping the product over Razzleberry. Come back with the E25 to smooth the transition between the two shades and make it seamless.
5. Draw a winged eyeliner.
6. With an E30 place Cocoa Bear under the lower lashline to enhance the look, blend it well then place Burlesque with an E15. This is an extra step you don't have to do though!
7. To finish highlight the inner tear duct with Cinderella and blend it into Cocoa Bear.
8. Put mascara and you're all done!
I hope you enjoyed this look as much as I did! I really liked the pop of color and Razzleberry is trully an amazing shade... I'm so sorry it's out of stock again...
Anyway, I wish you all an amazing day!
<3<3
Maylee
I don't know for you but here's Summer is finally here! So is Razzleberry in the Makeup Geek store! I've been wanting this shade since I first discovered the brand but it was always out of stock! Sadly it's is already out of stock again but I was able to have my own so I tried it with this look which also features my favorite pigment from Makeup Geek, and no, it's not Afterglow but Nightlife.
Products used:
Makeup Geek Eyeshadows: Peach Smoothie, Cupcake, Razzleberry (obviously ;)), Cocoa Bear, Burlesque and Cinderella
Makeup Geek Pigment: Nightlife
Sigma Brushes
Tutorial
1. Blend Peach Smoothie all over the lid with an E40, this warm shade is just the perfect peachy pink to use as a transition shade for this look!
2. With an E35, place Cupcake on the outter V and stretch it into the crease, here, this color will smooth harsh line with the main lid colors.
3. Place Razzleberry with an E25 on the outter V and the crease, on a smaller part than Cupcake.
4. With an E55 place Nighlife on the inner part of the lid beginning in the very inner then sweeping the product over Razzleberry. Come back with the E25 to smooth the transition between the two shades and make it seamless.
5. Draw a winged eyeliner.
6. With an E30 place Cocoa Bear under the lower lashline to enhance the look, blend it well then place Burlesque with an E15. This is an extra step you don't have to do though!
7. To finish highlight the inner tear duct with Cinderella and blend it into Cocoa Bear.
8. Put mascara and you're all done!
I hope you enjoyed this look as much as I did! I really liked the pop of color and Razzleberry is trully an amazing shade... I'm so sorry it's out of stock again...
Anyway, I wish you all an amazing day!
<3<3
Maylee
Tuesday, June 3, 2014
Plum and Mint
Hello Starshines!
I hope your Monday is going well and that sun is shining upon you!!! Today I played with some colors for a soft look featuring purples and greens!


Products used:
Makeup Geek Eyeshadows in: Crème Brulee, Sensuous, Unexpected, Drama Queen, Shimmermint and Envy
Maybelline Eyestudio Gel Liner
Cover Girl Lashblast Volume Mascara
Revlon Colorstay Foundation oily/combo in 150 Buff
Catrice Bronzer Medium Dark
Essence multi-color Blush
Estee Lauder Lipstick in Rose Tea
Sigma Brushes
Tutorial
1. Blend Crème Brulee with an E40 taking it high in the crease. This warm color will enhance the cool look that will be on the lid and help the others colors to blend properly.
2. Take an E30 to blend Sensuous on the higher crease. Begin with dabbing some of the product on the outter V then spread it out in a rainbow motion to the inner part of the lid. Here you want to drag the color pretty far and keep the center of the lid naked. This step will draw a rainbow from the inner to the outter corner of your eyes.
3. With an E44 take Unexpected to smooth the edges and blend the colors well. This matte shade will also avoid any weird stuffs happening as we're working with shimmery colors.
4. Take an E25 and Drama Queen, be careful not to take too much of the product (and we all know it's kind of hard with Makeup Geek eyeshadows as they are sooooo pigmented XD) and dab it cautiously on the very outter V then work it (brush held sideways) into the crease and stretch it toward the inner corner. Again the center of the lid must stay naked.
5. With an E39 smooth any harsh line
6. Take and E55 and place Shimmermint on the center of the lid.
7. I made a thin line of eyeliner but you can easily skip this step as the colors are pretty intense. I personally wouldn't make any thicker line because there's already a lot happening on the lid but it's your choice ;)
8. With an E15 place Envy on the outter lower lashline and Sensuous in the middle then smudge it out with an E20 and Unexpected.
9. With a Makeup Geek Pencil Brush, dab some Shimmermint on the very center. This step will add an extra pop to the look!
10. Highlight your inner tear duct (Makeup Geek Shimma Shimma) put mascara and you're all done!
I hope you enjoyed this look and will try it! These colors will specially compliment hazel and brown eyes but the association of both green and purple will suit everyone!
Please let me know in the comments if you liked this look or have any other suggestions/requests! And don't forget to follow me on my various social networks ;)
I wish you all a great week
<3<3
Maylee
I hope your Monday is going well and that sun is shining upon you!!! Today I played with some colors for a soft look featuring purples and greens!
Products used:
Makeup Geek Eyeshadows in: Crème Brulee, Sensuous, Unexpected, Drama Queen, Shimmermint and Envy
Maybelline Eyestudio Gel Liner
Cover Girl Lashblast Volume Mascara
Revlon Colorstay Foundation oily/combo in 150 Buff
Catrice Bronzer Medium Dark
Essence multi-color Blush
Estee Lauder Lipstick in Rose Tea
Sigma Brushes
Tutorial
1. Blend Crème Brulee with an E40 taking it high in the crease. This warm color will enhance the cool look that will be on the lid and help the others colors to blend properly.
2. Take an E30 to blend Sensuous on the higher crease. Begin with dabbing some of the product on the outter V then spread it out in a rainbow motion to the inner part of the lid. Here you want to drag the color pretty far and keep the center of the lid naked. This step will draw a rainbow from the inner to the outter corner of your eyes.
3. With an E44 take Unexpected to smooth the edges and blend the colors well. This matte shade will also avoid any weird stuffs happening as we're working with shimmery colors.
4. Take an E25 and Drama Queen, be careful not to take too much of the product (and we all know it's kind of hard with Makeup Geek eyeshadows as they are sooooo pigmented XD) and dab it cautiously on the very outter V then work it (brush held sideways) into the crease and stretch it toward the inner corner. Again the center of the lid must stay naked.
5. With an E39 smooth any harsh line
6. Take and E55 and place Shimmermint on the center of the lid.
7. I made a thin line of eyeliner but you can easily skip this step as the colors are pretty intense. I personally wouldn't make any thicker line because there's already a lot happening on the lid but it's your choice ;)
8. With an E15 place Envy on the outter lower lashline and Sensuous in the middle then smudge it out with an E20 and Unexpected.
9. With a Makeup Geek Pencil Brush, dab some Shimmermint on the very center. This step will add an extra pop to the look!
10. Highlight your inner tear duct (Makeup Geek Shimma Shimma) put mascara and you're all done!
I hope you enjoyed this look and will try it! These colors will specially compliment hazel and brown eyes but the association of both green and purple will suit everyone!
Please let me know in the comments if you liked this look or have any other suggestions/requests! And don't forget to follow me on my various social networks ;)
I wish you all a great week
<3<3
Maylee
Sunday, June 1, 2014
Calling Neptune
Hello Starshines!
I recently recieved my latest ordrer from Makeup Geek. This time I had chosen to be bold and placed Neptune in my shopping cart! This is a vibrant blue not easy to wear that's for sure! But I needed a challenge so I played around with it and came with this look! I love it because it's bright and bold but still sober. I placed warm color under the lower lash line to make sure this will not drawn my eyes down. This look will particurlarly suits brown and hazel eyes (like me) and grey eyes as well!


Product used
Makeup Geek Eyeshadows in: Crème Brulee, Neptune, Stealth, Ocean Breeze, Mermaid, Goddess, Glamorous and Brown Sugar.
Maybelline Eyestudio Gel Liner
Cover Girl Lashblast Volume Mascara
Sigma Brushes
Essence eyebrow kit
Revlon Colorstay Foundation oily/combo in 150 Buff
Catrice Bronzer Medium Dark
Milani Baked Blush Luminoso
Essence Highlight Powder (LE)
How to
1. Taking an E40 blend Crème Brulee all over the eyelid and the crease. As we will be working with cool shades, this warm brown will wake the look and avoid downcast look.
2. With an E55 dab Neptune all over the mobile lid, don't take it too high in the crease and blend the edge with sweeping motion holding the brush parallel to the crease.
3. Take an E35 and place Stealth on the crease, begin dabbing it on the outter V then stretch it above the crease making sure you blend it well with Neptune unerneath.
4. With an E45 place Ocean Breeze on the outter V, dab it first on the very outter corner then sweep in in swirling motion.
5. With an E32 blend Mermaid on the inner corner taking it a little high in the crease. You can dab some more Neptune on the eyeball to make sure the color is vibrant enough!
6. Line your eyes, there I chosed a pretty dramatic winged look because I felt like all this color needed some strong shield to prevent any clown-like look!
7. For the lower lashline take an E20 and blend Goddess on the outter part and Glamorous on the inner part. Make sure those two colors blend well and take a fluffy brush to ease the harsh lines and smooth the colors.
8. With an E15 draw a thin line on the outter corner with Brown Sugar just to define the eye.
9. Then mascara and you're done!
I hope you enjoyed this tutorial and if you have any comments, please let me know! Don't forget to follow me on Twitter, Instagram and Facebook, this would mean a lot to me ;) I love you all and I wish this look made you want to wear some bold colors!
Have a wonderful day and take care of yourself!
<3<3
Maylee
I recently recieved my latest ordrer from Makeup Geek. This time I had chosen to be bold and placed Neptune in my shopping cart! This is a vibrant blue not easy to wear that's for sure! But I needed a challenge so I played around with it and came with this look! I love it because it's bright and bold but still sober. I placed warm color under the lower lash line to make sure this will not drawn my eyes down. This look will particurlarly suits brown and hazel eyes (like me) and grey eyes as well!
Product used
Makeup Geek Eyeshadows in: Crème Brulee, Neptune, Stealth, Ocean Breeze, Mermaid, Goddess, Glamorous and Brown Sugar.
Maybelline Eyestudio Gel Liner
Cover Girl Lashblast Volume Mascara
Sigma Brushes
Essence eyebrow kit
Revlon Colorstay Foundation oily/combo in 150 Buff
Catrice Bronzer Medium Dark
Milani Baked Blush Luminoso
Essence Highlight Powder (LE)
How to
1. Taking an E40 blend Crème Brulee all over the eyelid and the crease. As we will be working with cool shades, this warm brown will wake the look and avoid downcast look.
2. With an E55 dab Neptune all over the mobile lid, don't take it too high in the crease and blend the edge with sweeping motion holding the brush parallel to the crease.
3. Take an E35 and place Stealth on the crease, begin dabbing it on the outter V then stretch it above the crease making sure you blend it well with Neptune unerneath.
4. With an E45 place Ocean Breeze on the outter V, dab it first on the very outter corner then sweep in in swirling motion.
5. With an E32 blend Mermaid on the inner corner taking it a little high in the crease. You can dab some more Neptune on the eyeball to make sure the color is vibrant enough!
6. Line your eyes, there I chosed a pretty dramatic winged look because I felt like all this color needed some strong shield to prevent any clown-like look!
7. For the lower lashline take an E20 and blend Goddess on the outter part and Glamorous on the inner part. Make sure those two colors blend well and take a fluffy brush to ease the harsh lines and smooth the colors.
8. With an E15 draw a thin line on the outter corner with Brown Sugar just to define the eye.
9. Then mascara and you're done!
I hope you enjoyed this tutorial and if you have any comments, please let me know! Don't forget to follow me on Twitter, Instagram and Facebook, this would mean a lot to me ;) I love you all and I wish this look made you want to wear some bold colors!
Have a wonderful day and take care of yourself!
<3<3
Maylee
Subscribe to:
Posts (Atom)